
Orca Slicer Calibration: The Ultimate Guide to Precision 3D Printing (2025)
Orca Slicer Calibration is one of the most essential processes to master if you want flawless, high-quality 3D prints. Whether you’re a beginner learning the ropes or a seasoned maker looking to fine-tune your machine, calibration is the key to unlocking consistent and reliable results. Even the most advanced 3D printers will fall short without proper calibration, leading to failed prints, poor dimensional accuracy, and material waste.
Orca Slicer makes calibration simple with its easy-to-use interface, step-by-step calibration tools, and powerful features designed to maximize your printer’s potential. From basic flow rate adjustments to advanced pressure advance settings, Orca Slicer provides everything you need to take your 3D printing to the next level.
In this comprehensive guide, you’ll learn why calibration matters, how to calibrate your printer using Orca Slicer, and the best practices to ensure every print meets your expectations. Whether you’re printing prototypes, functional parts, or artistic creations, calibration is your secret weapon for perfect prints.
What is Orca Slicer Calibration?
Orca Slicer Calibration is a set of built-in tools within the Orca Slicer software that allows you to fine-tune and optimize the settings of your 3D printer. It helps adjust essential parameters such as temperature, flow rate, retraction, and more to deliver better quality prints, minimize defects, and maximize efficiency.
The Importance of Calibration in 3D Printing:
Calibration ensures that your printer delivers consistent, accurate, and high-quality prints. Here’s why calibration is crucial:
- Dimensional Accuracy: Correct calibration helps maintain the exact dimensions of your printed objects, essential for mechanical parts and fittings.
- Print Quality: Reduces common issues like stringing, under-extrusion, blobs, and warping.
- Material Efficiency: Optimizes filament usage, reducing waste and saving costs.
- Prevents Wear and Tear: Reduces stress on your printer components by ensuring they operate within their intended parameters.
- Consistency: Once calibrated, your printer will consistently produce reliable results across different projects and materials.
- Better Adhesion and Layer Bonding: Calibration of temperature and flow rate helps improve layer adhesion and minimizes issues like layer separation.
Key Features of Orca Slicer Calibration:
Here’s an expanded and more detailed Key Features of Orca Slicer Calibration section, with added points and deeper explanations for each feature.
1. Custom Printer Profiles:
Easily create, save, and switch between profiles tailored for different 3D printers or filament types. This feature is invaluable for users managing multiple printers or experimenting with various materials, ensuring consistent settings without reconfiguration each time. It also allows backup and sharing of profiles across teams or projects.
2. Temperature Control:
Dial in the perfect nozzle and bed temperatures for each filament type. Fine temperature adjustments help improve layer adhesion, prevent warping, and reduce stringing. The temperature calibration includes automated temperature towers and cooling fan control, giving you better control over bridging and overhang quality.
3. Layer Height Adjustment:
Optimize your prints for quality or speed by adjusting the layer height. Orca Slicer supports dynamic layer height, automatically increasing resolution for curved or detailed sections and thicker layers on flat surfaces. This results in a balance between detailed surface finishes and efficient print times.
4. G-Code Preview:
Visualize every movement your printer will make with the G-code preview tool. It highlights toolpaths, extrusion width, and travel moves, helping users spot potential errors before printing. This preview reduces the chances of print failures and material waste.
5. Multi-Extruder Support:
Seamlessly manage dual or multi-extruder setups. The slicer allows for independent calibration of each extruder’s temperature, retraction, and flow rate. It supports multi-material and multi-color printing with clear workflow management, ensuring accurate tool switching and alignment.
6. Advanced Calibration Tools:
Access a comprehensive suite of calibration utilities to fine-tune print settings. Tools include:
- Flow Rate Calibration for precise extrusion control
- Retraction Tests to minimize stringing and blobs
- Pressure Advance Calibration for smooth cornering and extrusion transitions
- Bridging and Overhang Tests to optimize cooling and support settings
- Tolerance Tests for mechanical accuracy
These tools work together to ensure your prints have excellent strength, dimensional accuracy, and visual appeal.
7. Input Shaping and Vibration Compensation:
Reduce ghosting and improve print sharpness by compensating for printer vibrations. Input shaping helps you maintain high print speeds without sacrificing quality, making it perfect for fast prototyping and large prints.
8. Adaptive Fan and Cooling Control:
It automatically adjusts fan speeds during different print stages for optimal cooling. Overhangs, bridges, and small features receive targeted cooling, improving print quality without overcooling and risking layer separation.
9. Smart Infill Patterns and Density Adjustment:
Select from various infill patterns (grid, gyroid, cubic, etc.) and densities to balance print strength and material usage. Adaptive infill density allows denser infill near surfaces and lighter fill in the core, optimizing strength and reducing print time.
10. Real-Time Filament Diameter Compensation:
Account for variations in filament diameter by automatically adjusting extrusion flow in real-time. This ensures consistent extrusion rates, reducing risks of over- or under-extrusion caused by inconsistent filament manufacturing.
Guide to Orca Slicer Calibration Tools and Tests:
Here’s your enhanced section for Orca Slicer Calibration Menu: Tools and Tests Explained with 3-4 additional lines for each test to give more detail and make it more informative.
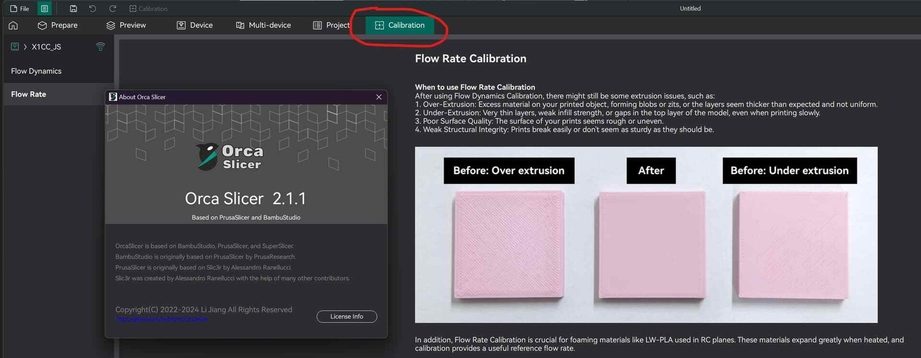
1. Flow Rate Calibration:
Ensures that your printer extrudes the correct amount of filament, avoiding over- or under-extrusion that can ruin print quality. By printing a single-wall cube and measuring its thickness, you can adjust your flow rate or extrusion multiplier precisely. This calibration improves layer bonding, surface quality, and dimensional accuracy. Regular flow rate calibration is essential when switching between different filament brands or diameters.
2. Temperature Tower Test:
Helps you determine the best nozzle temperature for any filament by printing towers with temperature gradients. The lower sections of the tower print at lower temperatures, while higher ones print hotter. Evaluating layer adhesion, stringing, bridging, and surface finish at each temperature helps find the sweet spot for your material. A proper temperature setting enhances print strength, minimizes warping, and reduces surface imperfections.
3. Retraction Test:
Reduces stringing by adjusting retraction distance and speed, ensuring cleaner prints. Retraction pulls the filament back during travel moves, preventing oozing. With Orca Slicer, you can test different settings on one model, making it easier to fine-tune. Correct retraction settings lead to cleaner transitions, reduced blobs, and improved print clarity—especially important for complex models with multiple retractions.
4. Pressure Advance Calibration:
Compensates for pressure lag in the extruder, ensuring sharp corners and smooth lines without blobs. This feature is particularly useful for high-speed printing, where filament pressure changes rapidly. By fine-tuning the pressure advance, you can eliminate under-extrusion at the start of lines and over-extrusion at the ends. It’s especially beneficial for Bowden setups, reducing ghosting and improving surface finish.
5. Tolerance Test:
Checks how accurately your printer can handle tight tolerances, crucial for mechanical parts. This calibration involves printing objects with known gaps or fits and testing for smooth movement or proper assembly. It’s invaluable for designers creating interlocking parts or functional prints like gears. Consistent tolerance calibration ensures parts fit as designed without the need for post-processing or sanding.
6. Vertical Line Artifact Calibration:
Fixes issues like vertical banding by fine-tuning extrusion consistency and printer mechanics. Vertical artifacts often result from inconsistent extrusion, loose belts, or Z-axis imperfections. By running this calibration and making necessary hardware adjustments, you can achieve smoother walls and professional-quality finishes. This step is particularly helpful when printing large, tall objects where artifacts become more noticeable.
Stepwise Calibration Process in Orca Slicer:
- Ensure the print bed is properly leveled, the belts are tightened, and there is no mechanical looseness in the printer.
- Measure how much filament your extruder pushes out and adjust the extruder steps (E-steps) for accurate extrusion.
- Print a temperature tower to find the best nozzle temperature for the filament you are using.
- Run a retraction test by printing a tower and adjust retraction distance and speed to minimize stringing.
- Print single-wall objects, measure their thickness, and adjust the flow rate or extrusion multiplier for consistent walls.
- Perform pressure advance calibration to eliminate blobs and gaps, especially in sharp corners and fast prints.
- Print tolerance test models to check for accurate part fitting and dimensional precision.
- Review the G-code preview in Orca Slicer to spot potential issues before starting the actual print.
Troubleshooting Common Orca Slicer Calibration Problems:
Here’s the information you provided, neatly organized in a table format:
| Issue | Solution |
| Poor Bed Adhesion | – Re-level the bed – Clean the print surface – Adjust Z-offset |
| Over/Under-Extrusion | – Recalibrate E-steps – Adjust flow rate |
| Stringing or Blobs | – Fine-tune retraction settings – Lower nozzle temperature |
| Dimensional Inaccuracy | – Perform tolerance testing – Adjust flow rate and scaling settings |
| Surface Artifacts | – Calibrate pressure advance – Check for mechanical issues like loose belts |
Advanced Tips and Tricks for Flawless Calibration:
- Use High-Quality Filament:
Cheap filament often has an an inconsistent diameter, affecting calibration. - Measure Filament Diameter:
Enter accurate measurements in Orca Slicer for better flow control. - Print Benchmark Models:
Use standardized models like Benchy or calibration cubes to validate your settings. - Update Firmware Regularly:
Ensure your printer firmware is compatible with Orca Slicer features. - Document Settings:
Keep a log of profiles for different printers and materials.
Advanced Orca Slicer Calibration Settings (Bonus):
Here’s an expanded version :
1. Linear/Pressure Advance:
Fine-tune the responsiveness of extrusion to movement changes. This setting helps prevent blobs at the start and under-extrusion at the end of lines, which is especially noticeable in corners and sharp turns. Ideal for improving print quality at higher speeds, particularly on Bowden extruder setups.
2. Dynamic Layer Height:
Automatically adjust layer height depending on the complexity of the model’s surface. Lower layer heights are used for curved or detailed areas, while thicker layers are used for flat sections, significantly improving print times without sacrificing surface quality.
3. Input Shaping/Vibration Compensation:
Reduces ghosting and ringing caused by vibrations during fast printing movements. Input shaping smooths out sudden directional changes in the printer’s movements, ensuring cleaner edges and improved accuracy, especially at higher speeds.
4. Adaptive Fan Control:
Adjusts cooling fan speeds dynamically during the print process. This ensures optimal cooling for overhangs, bridges, and thin walls while reducing unnecessary fan use, leading to quieter operation and energy efficiency.
Conclusion:
Mastering Orca Slicer Calibration is the key to unlocking consistent, high-quality 3D prints. By fine-tuning flow rate, temperature, retraction, and advanced settings like pressure advance and input shaping, you can dramatically improve print accuracy and surface finish. Whether you’re a hobbyist or professional, regular calibration ensures optimal performance and minimizes failed prints. Ready to take your 3D printing to the next level? Download Orca Slicer, follow this step-by-step calibration guide, and start printing with precision and confidence today!
FAQs:
Every time you change materials, swap nozzles, or make hardware changes.
Yes, it supports most popular 3D printers with customizable profiles.
No, but digital calipers and precise measuring tools help achieve better results.
Yes, the interface is user-friendly and includes helpful guidance for each calibration step.
Start with temperature towers, retraction tests, and single-wall calibration cubes.
